Applying makeup can be fast, simple, and easy; however, using the wrong shades and improper technique can make your makeup look fake and unnatural. This article will not only show you how to apply basic makeup, but also give you a few tips for choosing the right colors and shades. Don't be afraid to experiment with the amount and type of makeup you're using. Trying a few different application techniques can also be helpful in finding the perfect makeup look just for you!
EditSteps
EditApplying Foundation and Powder
- Start with a clean face. Wash your face with a gentle cleanser and pat it dry. You can also use a cleanser with exfoliating microbeads or buff your skin with an exfoliating face sponge.
- Try wiping your face with a cotton ball soaked in toner. This will help tighten your pores.
- Pat your face dry with a clean towel.
- If you use a cleanser with an exfoliator, you should rinse your face before patting it dry with a towel.
- Apply some moisturizer. Chose a moisturizer that is appropriate for your skin type and apply it to your face. Gently dot it along your nose, cheekbones, and forehead, and blend it in using circular motions.
- If you dislike wearing too much on your face, you can purchase a tinted moisturizer that matches your skin tone. This way, you won't have to apply primer or foundation.
- To determine which moisturizer is right for a certain skin tone, check the labels for products specific to your issue (oily skin, dry skin, sensitive skin, etc.).
- Consider applying some primer. While applying face primer is not necessary, it can help you achieve that smooth, air-brushed finish by filling in any gaping pores. Most primers also act as a binding solution to help makeup stay on your skin longer. You can use a basic face primer, or you can use one with special qualities, such as a matte finish or a redness reducer. You can purchase them in a beauty shop or boutique.
- Consider applying some concealer. Concealer is great for hiding discolorations, blemishes, and those dreaded under-eye circles. Choose a concealer that is the same color as your foundation, but one or two shades lighter. Gently apply the concealer over the blemish, discoloration, or under-eye circle using a tapping motion. You can use your finger, a makeup sponge, or even a small brush. There are different types of concealer, the under-eye area needs a thinner formula than what you would cover blemishes in other areas with, or it will crack. Be sure to blend the edges of the concealer into your skin.[1] To make sure concealer doesn't crack or wrinkle, quickly pat some powder over the concealer, powders that are translucent or your skin tone blend best. You can also use a color-correcting concealer to cover up some problem areas. Here are some tips:[2]
- If you have red areas or pimples, use green concealer. The green will conceal out the redness.
- If you have dark circles under your eyes, use orange or yellow-tinted concealer.
- If you have a yellowish skin tone, use some lilac-tinted concealer. The lilac pigment will help cancel out the yellow.
- Choose a foundation color that matches your skin tone. You can do this by placing a small amount along your jaw. Some companies sell foundations for cool, neutral, and warm undertones. If you are purchasing a foundation from such a company, make sure that you purchase the right skin tone and undertone. Getting foundation in the wrong skin tone and undertone can make your face look orangey, yellowish, or ashy. Yikes! Here are some quick tips for determining your skin undertone:[3]
- If your veins look purple or blue, you have a cool undertone. If your veins look green, you have a warm undertone. If you cannot tell, you most likely have a neutral undertone.
- If you look best in cool colors, such as bright greens, blues, and purples, you have a cool undertone. If you look best in warmer colors, such as reds, oranges, yellows, and olive-greens, then you have a warm undertone. If you look good in all colors, then you have a neutral undertone.
- If you look best in silver jewelry, you have a cool undertone. If you look best in gold jewelry, you have a warm undertone. If you look good in both gold and silver, then you have a neutral undertone.
- Decide how much coverage you want. When selecting your foundation, it is also important to decide how much coverage you want. There are different types of foundations available, and each will give you different results. Here are some tips:[4]
- Cream foundation is thick, but it will give you the most coverage. You may not even need concealer for this foundation. It can feel heavy on your face, however. This type of foundation is suitable for normal and dry skin types.
- Liquid foundation can give you a sheer coverage to a medium coverage. It will look more natural the sheerer it is, and will help even out your skin tone. Some blemishes may still show through, however, and you may need to use concealer. This type of foundation is suitable for dry and combination skin types.
- Powder foundation will give you the lightest coverage, and will look the most natural. It is the best for evening out your skin tone and giving you the no-makeup look. This type of foundation is suitable for oily skin types.
- Apply your foundation. There are many different ways you can apply your foundation. Coverage also depends on what you use to put the foundation on your skin. Generally beauty blenders give the most coverage, then foundation brushes, and then fingers or sponges. You can use your fingers, a makeup sponge, or even a foundation brush, depending on the type of foundation you have. Start applying your foundation to your nose, and work your way outward along your chin, cheeks, and nose bridge. Blend the foundation outward, and be sure to get your jaw line, sides of face, forehead, and neck.[5]
- If you are using powder foundation, you can apply the makeup using a makeup sponge or a powder brush.
- If you are using liquid foundation, you can use a makeup sponge, a makeup brush, or your fingers. If you choose to use a makeup sponge, consider dampening it in water first. This will prevent the sponge from soaking up too much foundation, and thus wasting it.
- If you are using cream foundation, you can use a makeup sponge, a makeup brush, or your fingers.
- Dust lightly with powder. Choose a powder that matches your skin tone and swirl your powder brush in it. Lightly tap or blow the excess powder off, then brush it onto your face. Focus on the nose, forehead, and cheekbones. The powder will help set the foundation and reduce shine. It will also further smooth your face in preparation for other powder makeup, such as blush and eye shadow. Be sure to dust any excess powder off your face.


EditApplying Makeup to Your Eyes
- Choose your eye shadow colors. You will need three different shades: a medium shade for the lid, a dark shade for the crease, and a light shade for the base and highlight. Try to choose colors from the same color family, such as all blues or all browns. Also, keep in mind that different colors may enhance different eye colors. Here are some suggestions:[6][7][8]
- For the best blending, eye shadow should have four different shades: The lightest (a shade close to white) on the inner corner and just under your browbone, the second lightest over the lid, next darkest on the crease, and darkest on the outer corner blended in.
- If you have blue eyes, you can wear similar shades, such as dark blue, grey, and silver. You can also wear contrasting shades, such as bronze, brown, copper, and taupe.
- If you have brown eyes... you can wear similar shades, such as bronze, brown, and taupe. You can also wear contrasting shades, such as blue, green, grey, and purple.
- If you have green eyes, you can wear similar shades, such as green, and forest green. You can also wear contrasting shades, such as gold, pink, taupe, and purple.
- If you have grey eyes you can wear similar shades, such as blue, charcoal, and silver. You can also wear contrasting shades, such as brown, gold, green, and purple.
- If you have hazel eyes, you can use greens and golds to bring out the greens and golds in your own eyes. You can also use contrasting colors, such as plum, reddish-brown, and wine.
- To make your eye makeup brighter and longer-lasting, apply an eyeshadow primer before any shadow. Or simply use a dot of liquid concealer in place of primer.
- Apply the base and highlight. Choose your lightest shade. Swirl your brush in the eye shadow and sweep it over your entire eyelid, from the lash line all the way up to the eyebrow. Gently blend the shadow towards the corner or you eye and away from your eye. You can leave your eye shadow like this, or add extra definition by adding some shadow and lid color.
- Consider brushing some loose powder under your eye, just beneath the eye lashes. This will catch any loose specks of eye shadow. When you are done applying your eye shadow, you can brush this powder off using a clean brush.
- Some people do not like having the same highlight color as their base. If this applies to you, you can use an eye shadow primer to stop your eye shadow from creasing. Be sure to apply your highlight in your inner corners to open up your eyes and to your brow bone to give your eyes definition.
- Apply the lid color. Swish you brush across the medium shade and sweep it along the entire eyelid, going from right next to inner corner of your eye to the outer corner.
- Apply the crease color. Take a smaller brush and sweep it across the darkest shade. Run it along the crease of your eye, going in an arch starting from the outer corner and following the shape of your natural eye socket, or where your eyelids fold in when you open your eyes.
- Blend your eye shadow. Using a small, fluffy brush, go over the eyelid, where the lid meets the crease. Next, go over the brow, where the crease meets the brow. When you blend, run your brush from the inner corner of your eye to the outer and back to the inner in a rainbow motion.
- If you brushed loose powder beneath your eye, you can dust it off after you have finished blending everything.
- Apply the eyeliner. Place the tip of your eyeliner as close as possible to the lash line on your upper lid. Slowly draw a smooth line, going from the middle of your eyelid to the outer corner. Then, going from the middle to the inner corner. You can extend the eyeliner a little bit beyond the outer corner, creating a wing tip. Whether you use eyeliner pencil or liquid eyeliner depends entirely on what is easiest for you to work with. Here are some more tips on applying eye liner:
- For a natural, daytime look, use brown or black-brown liner. For a more defined or evening look, use black eyeliner.
- It helps if you hold a pocket mirror in your other hand, and look down at the mirror while applying the eyeliner.
- You can also close your eye partway, and gently pull on the outer corner of your eye, stretching the lid. Draw your eyeliner in a neat line.
- You can use eyeliner or eye shadow on your bottom lid. Eyeliner will give you a more defined look, while a thin line of charcoal or dark brown eye shadow will give you a softer look.
- Apply the mascara. Start applying your mascara from the middle of your eye. Dip the brush into the container and pull it out, dragging it along the rim of the container to remove any excess mascara. Bring the brush as close as possible to your lash line and gently pull it up, wiggling it from side to side slightly; lower your eyelids at the same time as you are pulling the brush up. Repeat the process for the outer and inner corners of your eye.
- You can apply some mascara to your bottom lashes. Simply bring the brush as close as possible to the lower lash line, and brush downward.
- Consider shading in your eyebrows. Unless you have very thick eyebrows, you might want to fill them in. You can use eyebrow pencil or eye shadow. Follow the natural curve of you eyebrow, making the color softer and lighter the closer it gets to your nose. In general, you want to use a color that is two to three shades lighter than your hair color, unless you have blonde hair. Then, go 2-3 shades darker. Here are some more tips:
- If you have blond or light colored hair, use a light brown or medium brown.
- For brown hair or medium-colored hair, use a medium or dark brown.
- If you have black hair, use a very dark brown. Never use black, as it will be too harsh.
- If you have red hair, use a color close to your hair color, but two to three shades darker.
- For other, unusual hair colors, such as blue, green, pink, or purple, consider using a shadow that matches your hair color, and going two to three shades darker. You can play around with colors, or use a color that matches your original eyebrow color.


EditApplying Makeup to your Lips and Cheeks
- Apply the blush. Choose a color that suits you, and apply it along or just barely on top of your cheekbones. How you apply your blush will depend on the type of blush you bought: cream or powder. If you are using a powder blush, then you can apply it with a powder brush. If you are using a cream blush, then lightly dab it onto your cheeks with your fingers, and then softly blend it outwards. Do not apply too much blush, however; you want just enough blush to give you a healthy glow. Here are some guidelines for finding the right shade of blush:[9]
- If you have light skin, go for soft pinks, light corals, and peaches.
- If you have medium skin, go for rich pinks, warm mauves, and deep peaches.
- If you have dark skin, go for deep fuchsias, warm browns, and tangerines.
- Consider adding some bronzer. For a healthy, sun-kissed look, you can apply some bronzer.
- Bronzer usually doesn't go on the nose, unless you're contouring, and then it's in very specific areas of the nose.
- Generally bronzer can go all over the face, but defines the face more when applied along jawline, under blush, and along the top of the forehead.
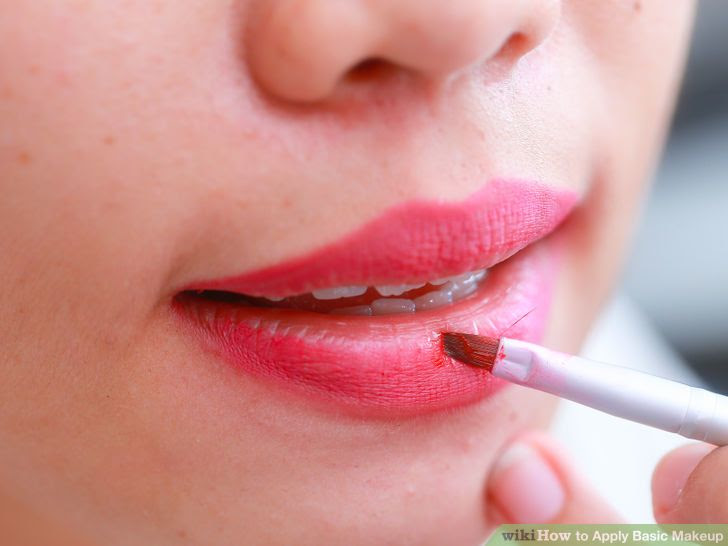
- Outline your lips with lip liner. Choose a color that matches your lipstick color. If you wish to have fuller lips, then make the line just outside your natural lip line. If you want to make your lips appear less full, then draw just inside the lip line.
- Fill your lips in with lipstick. You can run the lipstick directly over your lips, or you can use a lipstick brush. If you are using a lip brush, simply sweep it across the lipstick, and then run it over your lip. Be sure to stay within your lip lines. Once you have finished applying your lipstick, you can get rid of the excess by pressing your lips down on a piece of folded tissue.
- If you have really dry lips, then put some chap stick or lip balm before you put on your lipstick. This will help soften your lips and prevent too many creases.
- You can make your lipstick last longer by placing a tissue over your lips, and then dusting translucent powder over the tissue. Just enough powder will seep through the tissue to seal the lipstick in.
- For extra glimmer, apply a coat of lip gloss.
- Consider using lip gloss instead of lip liner and lipstick. If you are going for a neutral, natural look, you can omit the lip liner and lipstick, and brush on a coat of lip gloss instead. Lip gloss works well for the day time, because it is soft and light; lipstick works best for evenings.


EditTips
- Wear darker, brighter, heavier makeup in the evening.
- Wear lighter makeup with soft, neutral colors during the day.
- Consider setting your makeup once you have finished applying it with a light dusting of translucent face powder. You can also use makeup setting spray instead.
- Choose colors that suit your skin tone and undertone. Using the wrong shade can make your face look ashen and unnatural.
- Don't hesitate to ask the sales person at your local beauty shop for advice. He or she can help you find the best color of makeup for you.
- You can also sweep a highlight on the top of your cheekbones, down your nose, on your chin and maybe across your forehead.
EditWarnings
- Do not go to sleep in your makeup. Not only will you wake up to a messy, makeup-smeared face, but you will also clog your pores up. This will lead to breakouts. Always clean your face before going to sleep.
- Some people can be allergic to the ingredients allergic in makeup. If you develop any allergies, stop using your makeup immediately, and consider using organic or mineral-based makeup instead.
EditThings You'll Need
- Moisturizer (optional but recommended)
- Foundation and powder
- Eye shadow
- Eye liner and mascara
- Blush
- Lip liner and lipstick
- Makeup brushes, makeup sponges, and powder brushes
EditRelated wikiHows
- Apply Basic Eye Makeup
- Pick the Right Foundation Makeup
- Apply Makeup for a Natural Look
- Clean Makeup Brushes
- Choose Makeup Brushes
- Shop for Makeup
- Wear Makeup Everyday
EditSources and Citations
Cite error: <ref> tags exist, but no <references/> tag was found
source How to of the Day http://ift.tt/1KGh2Oh


Aucun commentaire:
Enregistrer un commentaire